How to install wordpress on Docker with devilbox on Ubuntu on Windows WSL2

Simple guide for advanced users on how to easily install docker and devilbox then install wordpress. all on ubuntu/debian on windows subsystem for linux known as WSL. make sure it’s WSL2. Haven’t we reached peak technology?

INSTALLATION:

First add docker key and repo, then create docker user & group and add your user to the group :

curl -fsSL https://download.docker.com/linux/ubuntu/gpg | sudo apt-key add -

sudo add-apt-repository "deb [arch=amd64] https://download.docker.com/linux/ubuntu $(lsb_release -cs) stable"
sudo apt update && sudo apt install docker-ce docker-ce-cli containerd.io

sudo groupadd docker && sudo usermod -aG docker $USER

newgrp docker

sudo service docker start

docker run hello-world

After starting docker and running hello-world . docker should tell you everything is fine.

then you need to install docker compose so you can run compose commands

Go to the page : https://github.com/docker/compose/releases
scroll down and find the link appropriate for your distro e.g. linux-x86_64. Right click and copy the link, then put between the quotations marks like below for version 2.6.0:

sudo curl -L "https://github.com/docker/compose/releases/download/v2.6.0/docker-compose-linux-x86_64" -o /usr/local/bin/docker-compose

sudo chmod +x /usr/local/bin/docker-compose

DEVIL BOX:

Then install the devil devilbox. It’s the devil son.👿

mkdir ~/dev/
cd ~/dev/
git clone https://github.com/cytopia/devilbox

Get user id

id -u

and get your group id

id -g

copy the results to .env example after renaming to .env

cd devilbox
cp env-example .env
nano .env

Find these lines and change them accordingly. if you got 1001 for id -g then place that in NEW_GID

NEW_UID=1000
NEW_GID=1001

Compose it up:

docker-compose up

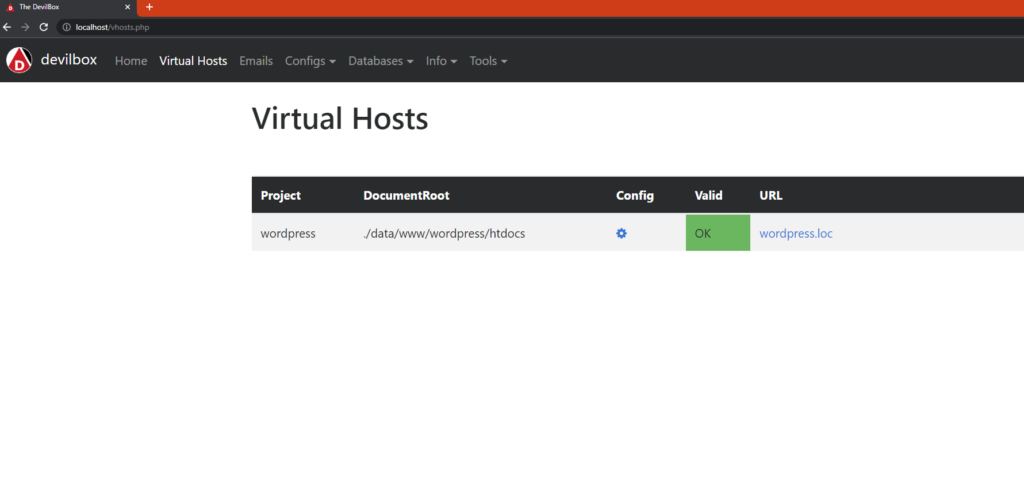
and you should be able to see the devil by going to localhost. If you get bunch of errors about couldn’t launch because port in use. Check which similar service is running on your computer and stop it. e.g. if you have installed nginx. stop nginx.

Now let’s add first website and install wordpress

cd data/www
mkdir wordpress
cd wordpress
git clone https://github.com/WordPress/WordPress htdocs
mysql -u root -h 127.0.0.1 -p -e 'CREATE DATABASE wordpress;'

No password necessary.

Edit hosts file for windows and add wordpress.loc (or the directory name you chose above plus .loc
You have to edit this as administrator. I use notepad++ so I open it in normal user make any edit click save and notepad++ will ask me if I want to open it again as administrator. I chose yes and make the actual edit and save:

Location of hosts file. Bill Gates knows why it is in drivers:
c:\Windows\System32\Drivers\etc\hosts

Devilbox virtual hosts

add at the end:

127.0.0.1 wordpress.loc

Now go to wordpress.loc in your browser and you should be able to install it.

How to install the latest wordpress from shell

Downloading wordpress zip file from wordpress.org to your PC then uploading it via ftp or sftp is the neanderthalic way to do it. It’s time consuming and more steps than it should be.  If you are going the hard route you could also copy wordpress codes by hand letter for letter you might even earn 3 karmas on reddit for that.

Doing it through terminal is easy on ubuntu/debian or non-debian like centos.  Just open terminal or shell prompt.  Go to your desired target directory where you want to install wordpress and issue the following commands

wget http://wordpress.org/latest.tar.gz && tar xfz latest.tar.gz

Now you download and untarred wordpress into a directory called wordpress.

If you want to install wordpress in a subdirectory. just rename it

mv wordpress yet_another_failed_blog

if you want to install it to root/current dir, mv everything from inside wordpress path

mv wordpress/* ./

then delete unnecessary files

rm -rf wordpress latest.tar.gz

Proceed with installation using your browser by navigating to your site. Be prepared to have your database name, database user and password ready.

Have a fun word pressing.

How do I reset mysql root password? I can’t login

It happens that you forget the password to the root to your mysql server especially in development server like on WSL system. then now you cannot access and control anything. you are officially an intruder, an outcast, a user without privilege.  LUSER.

Fret no more, as the solution is easy like a bug quashing routine. Actually easier.

Login to SSH or your local terminal. and Type the following commands. make sure you don’t forget the WHERE part and resets password on everything like some people! yours truly.

First you need to tell your mysql server to STAHP


sudo service mysql stop

Then you need a safe mysql daemon and skip grant tables to allow access without checks on privileges. Also skip networking to avoid connection from anywhere and restrict it to localhost for security reasons. The Ampersand is NEEDED


sudo mysqld_safe --skip-grant-tables --skip-networking &

What does mysqld_safe do is explained below from mysql website.

[blockquote]mysqld_safe tries to start an executable named mysqld. To override the default behavior and specify explicitly the name of the server you want to run, specify a –mysqld or –mysqld-version option to mysqld_safe. You can also use –ledir to indicate the directory where mysqld_safe should look for the server.[/blockquote]

Then you should type mysql after couple of lines printed and it seems waiting for prompt.

now in mysql console. type


use mysql;
UPDATE user SET authentication_string = PASSWORD ('YOUR NEW PASS HERE'),plugin='mysql_native_password' WHERE user='root';
FLUSH PRIVILEGES;
exit;

The reason for setting plugin to mysql_native_password is because if you haven’t set password before, left it on default. it will have auth_socket and it might return the following error, when you try to login as root:

connect to server at ‘localhost’ failed
error: ‘Plugin ‘auth_socket’ is not loaded’

now back in shell, stop then start mysql normally


sudo service mysql stop
sudo service mysql start

For non-debian systems, replace mysql with mysqld. because that’s what centos like.

How to test nginx configuration without breaking down the server

You simply use t and c flags followed by config file

sudo nginx -tc /etc/nginx/nginx.conf

This can give you output like this when ok:

nginx: the configuration file /etc/nginx/nginx.conf syntax is ok
nginx: configuration file /etc/nginx/nginx.conf test is successful

t flag according to man nginx means : Do not run, just test the configuration file. nginx checks the configuration file syntax and then tries to open files referenced in the configuration file.

c flag means: Use an alternative configuration file. the config file path should come after the c flag.

Why you should use this instead of restart? or reload? because when you do sudo service nginx restart and your config file is broken you’ll affect the whole server and if you have multiple websites that means all sites go down possibly because of some little curly boi ; . reload might not do anything when there is error. to be safe always test config before reloading or restarting. even if you do simple changes to main nginx config or sites configs.