404 Error when deploying Spring Boot WAR file on Tomcat 9

We recently encountered a problem when deploying a Spring Boot application as a WAR file on Tomcat 9. After deploying the WAR file to Tomcat, we received a 404 error when trying to access the application in a web browser. The Tomcat logs showed no errors or exceptions related to the deployment, and we were unsure of the root cause of the issue.

Solution Attempt 1: Check the WAR File and Dependencies

Our first step in troubleshooting the issue was to verify that the WAR file and its dependencies were correct and complete. We double-checked the contents of the WAR file and reviewed the application’s dependencies, but we found no issues that could explain the 404 error.

Solution Attempt 2: Check the Tomcat Configuration

Our next step was to review the Tomcat configuration and make sure that it was set up correctly for the application. We checked the server.xml file and made sure that the correct port and context path were specified, but we still encountered the 404 error.

Solution Attempt 3: Check the Spring Boot Configuration

We then turned our attention to the Spring Boot configuration and reviewed the application’s application.properties and application.yml files. We checked the server port and context path settings, but we found no issues that could explain the 404 error.

Tomcat server

Solution Attempt 4: Review the Spring Boot Code

Finally, we reviewed the Spring Boot code to make sure that the application was correctly configured for deployment as a WAR file on Tomcat. We checked the Spring MVC configuration, the Thymeleaf templates, and the view controllers, but we found no issues that could explain the 404 error.

Solution: Compatibility Issue with Spring Boot 3.0 and Tomcat 9

After exhausting all other possible solutions, we discovered that the root cause of the 404 error was a compatibility issue between Spring Boot 3.0 and Tomcat 9. It turns out that Spring Boot 3.0 requires Tomcat 10 or later, and Tomcat 9 is not compatible with this version of Spring Boot.

Once we upgraded to Tomcat 10, the application deployed and ran without any issues. We were able to access the application in a web browser and verify that all functionality was working correctly.

Conclusion

In summary, we encountered a 404 error when deploying a Spring Boot application as a WAR file on Tomcat 9. After trying various solutions and troubleshooting steps, we discovered that the root cause of the issue was a compatibility problem between Spring Boot 3.0 and Tomcat 9. Once we upgraded to Tomcat 10, the issue was resolved, and the application ran without any issues.

This experience highlights the importance of keeping up to date with software compatibility requirements and being aware of the potential issues that can arise when using different versions of software together. By staying informed and up-to-date, we can avoid similar issues in the future and ensure that our applications run smoothly and reliably.
Top 9 SEO plugins for WordPress to optimize your site for search engines

WordPress is one of the most popular content management systems (CMS) out there, and for good reason. It’s easy to use, flexible, and can be customized in countless ways with plugins. For those who are serious about their website’s search engine optimization (SEO), there are several plugins that can help. Here are 9 of the best WordPress plugins for SEO

Yoast SEO
Let’s start with the king of WordPress SEO plugins: Yoast SEO. This plugin is a must-have for anyone who wants to optimize their content for search engines. It has a ton of features, including a content analysis tool that checks your posts for readability and SEO, an XML sitemap generator, and a snippet preview that shows you how your post will look in search results.

All in One SEO Pack
Don’t like Yoast SEO? No problem! All in One SEO Pack is a great alternative. It’s been around for almost as long as Yoast SEO, and it’s just as powerful. It has many of the same features, including a content analysis tool, an XML sitemap generator, and the ability to control your meta tags and titles.

Google XML Sitemaps
A sitemap is an important part of your website’s SEO. It tells search engines what pages are on your site, how they’re organized, and how often they’re updated. Google XML Sitemaps is a plugin that automatically generates a sitemap for you, making it easy for search engines to find and index your content.

Rank Math
Rank Math is a relatively new player in the WordPress SEO plugin game, but it’s already making waves. It has a ton of features, including a content analysis tool, a built-in 404 monitor, and the ability to control your schema markup.

Broken Link Checker
Broken links can hurt your website’s SEO by making it look less credible to search engines. Broken Link Checker is a plugin that checks your site for broken links and alerts you when it finds them. It’s a great way to keep your site healthy and functioning properly.

WP Smush (Smush – Lazy Load  Images, Optimize & Compress Images)
Images are important for your website’s SEO, but they can also slow your site down. WP Smush is a plugin that compresses your images without sacrificing quality, making your site faster and more SEO-friendly.

Jetpack – WP Security, Backup, Speed, & Growth
Jetpack is a plugin that does a lot of things, including helping with your site’s SEO. It has a built-in sitemap generator, the ability to control your meta tags and titles, and a content analysis tool.

WP Meta SEO
WP Meta SEO is a plugin that helps you manage your website’s meta tags and titles. It also has a content analysis tool that checks your posts for SEO and readability.

Redirection
Finally, Redirection is a plugin that helps you manage your site’s 301 redirects. 301 redirects are important for SEO because they tell search engines that a page has permanently moved to a new URL. Redirection makes it easy to manage your site’s redirects and keep your SEO healthy.

In conclusion, optimizing your WordPress site for search engines can be a daunting task, but these 9 plugins can make it a lot easier.

How to install wordpress on Docker with devilbox on Ubuntu on Windows WSL2

Simple guide for advanced users on how to easily install docker and devilbox then install wordpress. all on ubuntu/debian on windows subsystem for linux known as WSL. make sure it’s WSL2. Haven’t we reached peak technology?

INSTALLATION:

First add docker key and repo, then create docker user & group and add your user to the group :

curl -fsSL https://download.docker.com/linux/ubuntu/gpg | sudo apt-key add -

sudo add-apt-repository "deb [arch=amd64] https://download.docker.com/linux/ubuntu $(lsb_release -cs) stable"
sudo apt update && sudo apt install docker-ce docker-ce-cli containerd.io

sudo groupadd docker && sudo usermod -aG docker $USER

newgrp docker

sudo service docker start

docker run hello-world

After starting docker and running hello-world . docker should tell you everything is fine.

then you need to install docker compose so you can run compose commands

Go to the page : https://github.com/docker/compose/releases
scroll down and find the link appropriate for your distro e.g. linux-x86_64. Right click and copy the link, then put between the quotations marks like below for version 2.6.0:

sudo curl -L "https://github.com/docker/compose/releases/download/v2.6.0/docker-compose-linux-x86_64" -o /usr/local/bin/docker-compose

sudo chmod +x /usr/local/bin/docker-compose

DEVIL BOX:

Then install the devil devilbox. It’s the devil son.👿

mkdir ~/dev/
cd ~/dev/
git clone https://github.com/cytopia/devilbox

Get user id

id -u

and get your group id

id -g

copy the results to .env example after renaming to .env

cd devilbox
cp env-example .env
nano .env

Find these lines and change them accordingly. if you got 1001 for id -g then place that in NEW_GID

NEW_UID=1000
NEW_GID=1001

Compose it up:

docker-compose up

and you should be able to see the devil by going to localhost. If you get bunch of errors about couldn’t launch because port in use. Check which similar service is running on your computer and stop it. e.g. if you have installed nginx. stop nginx.

Now let’s add first website and install wordpress

cd data/www
mkdir wordpress
cd wordpress
git clone https://github.com/WordPress/WordPress htdocs
mysql -u root -h 127.0.0.1 -p -e 'CREATE DATABASE wordpress;'

No password necessary.

Edit hosts file for windows and add wordpress.loc (or the directory name you chose above plus .loc
You have to edit this as administrator. I use notepad++ so I open it in normal user make any edit click save and notepad++ will ask me if I want to open it again as administrator. I chose yes and make the actual edit and save:

Location of hosts file. Bill Gates knows why it is in drivers:
c:\Windows\System32\Drivers\etc\hosts

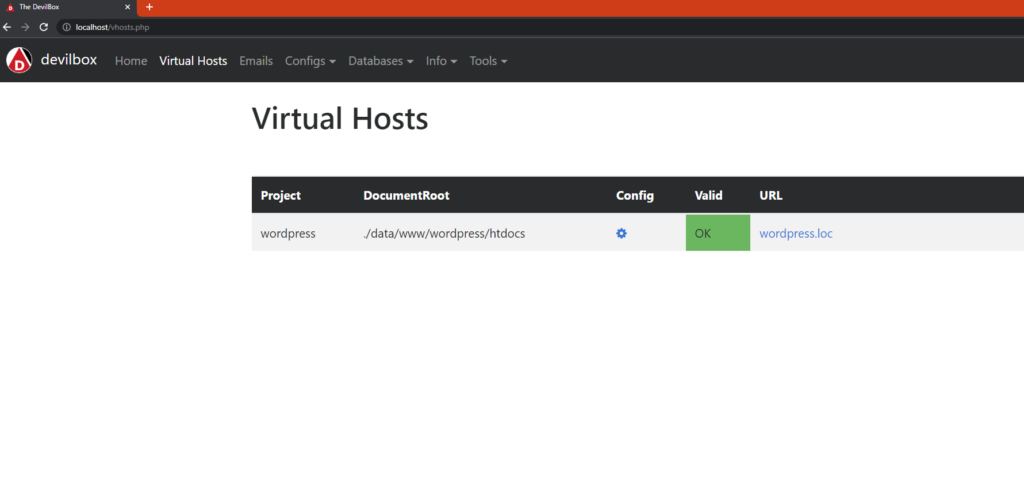
Devilbox virtual hosts

add at the end:

127.0.0.1 wordpress.loc

Now go to wordpress.loc in your browser and you should be able to install it.

How to install the latest wordpress from shell

Downloading wordpress zip file from wordpress.org to your PC then uploading it via ftp or sftp is the neanderthalic way to do it. It’s time consuming and more steps than it should be.  If you are going the hard route you could also copy wordpress codes by hand letter for letter you might even earn 3 karmas on reddit for that.

Doing it through terminal is easy on ubuntu/debian or non-debian like centos.  Just open terminal or shell prompt.  Go to your desired target directory where you want to install wordpress and issue the following commands

wget http://wordpress.org/latest.tar.gz && tar xfz latest.tar.gz

Now you download and untarred wordpress into a directory called wordpress.

If you want to install wordpress in a subdirectory. just rename it

mv wordpress yet_another_failed_blog

if you want to install it to root/current dir, mv everything from inside wordpress path

mv wordpress/* ./

then delete unnecessary files

rm -rf wordpress latest.tar.gz

Proceed with installation using your browser by navigating to your site. Be prepared to have your database name, database user and password ready.

Have a fun word pressing.

How do I reset mysql root password? I can’t login

It happens that you forget the password to the root to your mysql server especially in development server like on WSL system. then now you cannot access and control anything. you are officially an intruder, an outcast, a user without privilege.  LUSER.

Fret no more, as the solution is easy like a bug quashing routine. Actually easier.

Login to SSH or your local terminal. and Type the following commands. make sure you don’t forget the WHERE part and resets password on everything like some people! yours truly.

First you need to tell your mysql server to STAHP


sudo service mysql stop

Then you need a safe mysql daemon and skip grant tables to allow access without checks on privileges. Also skip networking to avoid connection from anywhere and restrict it to localhost for security reasons. The Ampersand is NEEDED


sudo mysqld_safe --skip-grant-tables --skip-networking &

What does mysqld_safe do is explained below from mysql website.

[blockquote]mysqld_safe tries to start an executable named mysqld. To override the default behavior and specify explicitly the name of the server you want to run, specify a –mysqld or –mysqld-version option to mysqld_safe. You can also use –ledir to indicate the directory where mysqld_safe should look for the server.[/blockquote]

Then you should type mysql after couple of lines printed and it seems waiting for prompt.

now in mysql console. type


use mysql;
UPDATE user SET authentication_string = PASSWORD ('YOUR NEW PASS HERE'),plugin='mysql_native_password' WHERE user='root';
FLUSH PRIVILEGES;
exit;

The reason for setting plugin to mysql_native_password is because if you haven’t set password before, left it on default. it will have auth_socket and it might return the following error, when you try to login as root:

connect to server at ‘localhost’ failed
error: ‘Plugin ‘auth_socket’ is not loaded’

now back in shell, stop then start mysql normally


sudo service mysql stop
sudo service mysql start

For non-debian systems, replace mysql with mysqld. because that’s what centos like.